VitalSource is a leading digital content platform that offers an extensive library of academic materials, textbooks, and learning resources. Its digital distribution platform is designed to empower educational institutions, students, and instructors by providing access to a diverse array of scholarly content. Integrating Salesforce with VitalSource LMS can be of profound benefit to educational institutions or partners helping with digital learning.

Some of the benefits can be narrowed down to:

  • Efficient Data Management: Centralized student data for easier tracking and management.
  • Personalized Learning: Tailored content to meet individual student needs and enhance their learning journey.
  • Enhanced Accessibility and Distribution: Easy access to a broad library of educational content from anywhere.

In this blog today, we will share how you can integrate Salesforce with Vitalsource using the most efficient integration platform Dell Bhoomi. So, let’s start!

A comprehensive Dell Boomi process for integrating Salesforce with Vitalsource

I have created a ‘VitalSource user’ as an example to explain the integration between Salesforce and VitalSource using Dell Boomi’s platform.

Here are the steps to follow:

Step 1: Log in to your Dell Boomi account and select integration from the services menu.

select integration from the services menu.

Step 2: Create a folder for the new process and select >New Component> Create Component>Process> edit the Start Process shape.

  • Select the standard Salesforce connector.
  • Click on Connection and create a new connection using the “+” icon.
Create a folder

Connection

In the Connection section follow these steps.

  • Enter end-point URL “https://login.salesforce.com/services/Soap/u/39.0”.
  • Insert your organization ID.
  • Combine your password and your organization’s Salesforce security token(password+ security token).
  • Save the connection.

Note: If you do not have the security token you can reset your it.

  • Follow the steps to reset your Salesforce security token.
  • Select the settings option from the profile in Salesforce.
  • Search security token in the search bar and click on Reset security token.
Search security token in the search bar
  • You can get a new security token on your registered email address.

Operation

In the Operation section follow these steps.

Create a new operation using the + icon.

  • Using the import button select the object of your salesforce.org.

Response profiles are automatically created after selecting an entity (object). The response profile stores your object data.

Using the import button select the object

You can also use a filter option if you want to get specific records from Salesforce org and pass the parameters.

You can also use a filter option

Step 3: Add a ‘Decision’ and ‘Map’ shape into your process using drag and drop. In decision shape, you can check whether the record is available or not using the record ID.

Add a ‘Decision’ and ‘Map’ shape into your process using drag and drop
  • In map shape you can create a new map using the ‘+’ sign.
  • After creating a map, you can choose a response profile for your source profile and create or import an XML profile using the import profile button from your local computer for your destination profile.
create or import an XML profile
  • Simply drag fields from the source and drop them on the destination fields to map them.
Simply drag fields from the source
  • I need only three fields to create a reference user in VitalSource, so I used only three fields.
  • Now that we have the final data from the map, it is time to send it to the VitalSource.

Step 4: Add an HTTP Client Connector shape for post request to your process using drag and drop.

Add an HTTP Client Connector shape
  • Click on Connection and create a new connection using the “+” icon.

Connection

In the Connection section follow these steps.

  • Enter the end-point URL for creating a user in VitalSource ‘https://api.vitalsource.com/v3/users’.
  • Set the Authentication type to “None” and save.
Enter the end-point URL for creating a user in VitalSource
  • Select the “send” operation in the action field.

Operation

  • Select Content Type as ‘text/xml’ and HTTP Method as a ‘post’.
  • Select the ‘Return HTTP Responses’ as a true.
  • You need to set the header for authorization in Request Headers click on the ‘+’ icon and set the header name and value.
  • Save the operation.
Select Content Type as ‘text/xml’ and HTTP Method as a ‘post’

Step 5: Now add a stop shape into your process using drag and drop to stop your process and save the process.

Your process has been successfully created and looks like this; you can test it using the Test button.

Your process has been successfully created

When the test is finished, check your VitalSource account to see account is created or not also you can check the user details in Postman.

check your VitalSource account
The record has been successfully created.

The record has been successfully created.

Conclusion

There you have it, your step-by-step guide to connecting Salesforce and Vitalsource easily using Dell Boomi’s drag-and-drop interface.

Try out the solutions in your org and feel free to share your feedback with us. And for Salesforce development tutorials, keep an eye on our next blogs!

Related Articles

In this detailed guide, we will walk you through the significant yet easy steps to configure Email to Salesforce. Without any further ado, let’s get started! About Email to Salesforce As the term refers, Email to Salesforce is valuable for any organization that businesses use as their Customer Relationship Management (CRM) platform. It helps streamline […]

Read More
Guide on CRUD Operations in Node.js with jsForce

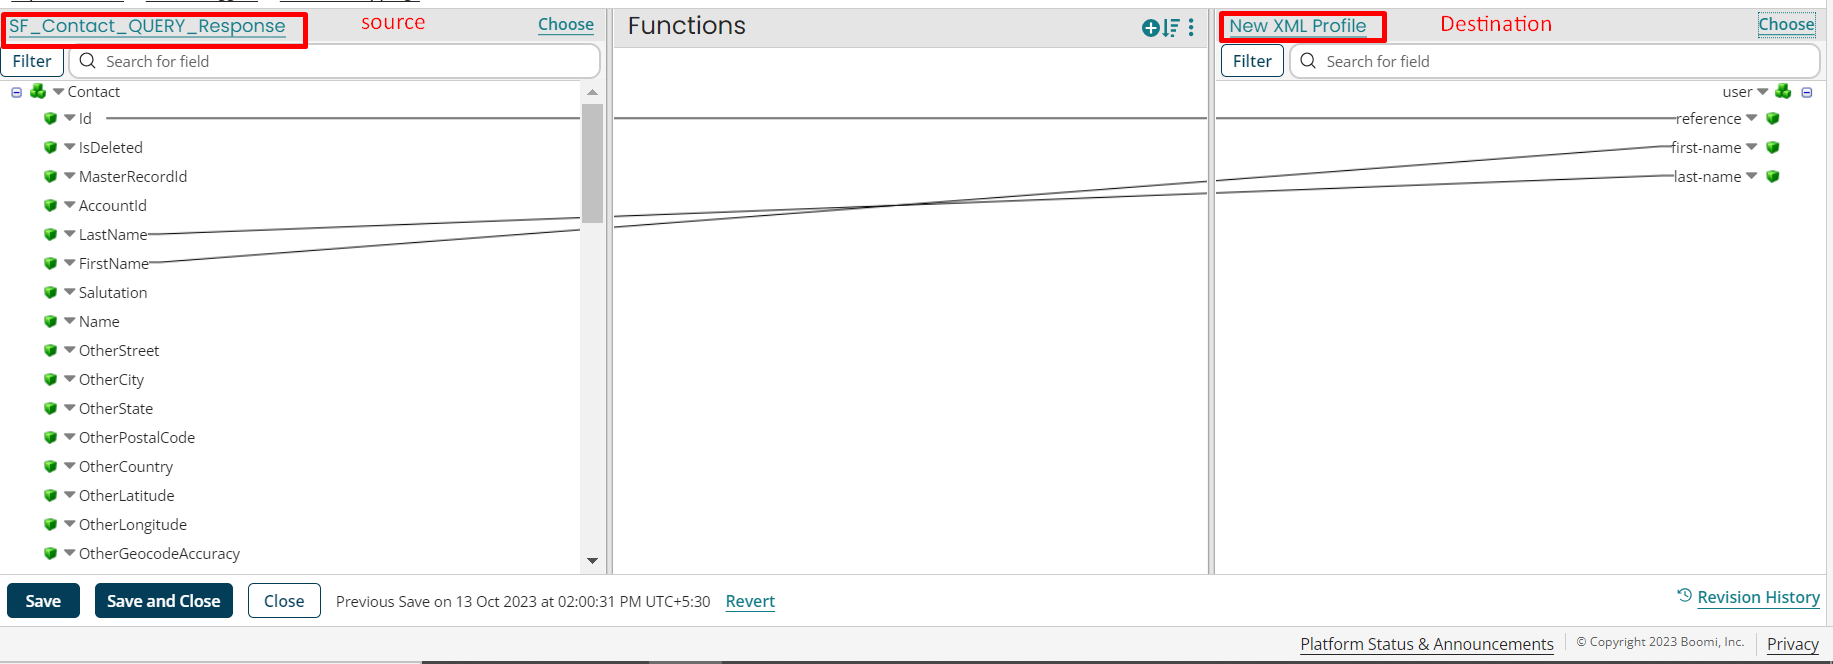
CRM developers typically need to integrate Salesforce with Node.js apps. One well-known library for this purpose is jsForce, which provides a comprehensive set of tools for interacting with Salesforce data and performing CRUD tasks effectively. Let’s dive into the blog, where you will understand the use of jsForce to execute key CRUD tasks within Salesforce, […]

Read More
How to Implement Round Robin Assignments in Salesforce Using Apex

Ensuring a proper workload balance and quick follow-ups from internal or external team members, leads, opportunities, or task distributions is crucial. To achieve this, all you need is a Round Robin assignment. In this step-by-step guide, we will walk you through the process of implementing a round-robin assignment in Salesforce using Apex. Here, we’ve used […]

Read More
Best Salesforce Developments Services Provider

In this step-by-step guide, we will walk you through the significant role of Large Data Volumes in Salesforce, and what strategies or practices you should keep in mind. What is Large Data Volumes? In Salesforce, Large Data Volumes (LDV) refers to managing a huge amount of records available in the platform. LDV usually comes into […]

Read More

Salesforce Apex includes numerous built-in text handling classes, and in addition to them, the Pattern and Matcher classes are good for performing complex string operations. These classes enable us to define and work with regular expressions, which are of particular importance for data validation, searching, and modification. In this technical blog, we will find out […]

Read More

Maintaining security and compliance in Salesforce requires effective user access management. This article will lead you through the process of creating expiration dates for Permission Sets and Permission Set Groups, allowing you to automate access removal while minimizing manual work. Know how this functionality simplifies workflows, guarantees compliance, and improves security procedures. Why Use Expiration […]

Read More
Our Location worldwide
Indian Flag India
3rd Floor, A-10, Pegasus Tower, Sector 68, Noida, Uttar Pradesh 201301 +91-1203117884
United States of America Flag USA
333 West Brown Deer Road Unit G – 366 Milwaukee WI, USA 53217 +1(262) 310-7818
United Kingdom Flag UK
7 Bell Yard, London, WC2A 2JR +44 20 3239 9428
Canada Canada
HIC Global Solutions INC
43 Lafferty Lane, Richmond Hill, L4C 3N8, CA +1(262) 310-7818