The Adobe Acrobat Sign for Salesforce application offers a straightforward and user-friendly approach to managing signature workflows, suitable for individuals or organizations.
With this application, users can effortlessly:

  • Obtain Authentic Adobe eSignatures or Approvals by securely requesting eSignatures or approvals for any document directly within Salesforce
  • Streamline Document Signing Processes, making it a valuable addition to your Salesforce environment.

In this guide, we will walk you through the steps to configure and set up Adobe Sign for Salesforce. But before we dive into the setup process, ensure that you have both “Adobe Acrobat Sign eSignatures for Salesforce” and “Adobe Acrobat Sign Document Builder for Salesforce” applications installed in your Salesforce organization.

You can find these applications on the Salesforce AppExchange:

Let’s get started with the configuration process to make the most out of Adobe Sign in Salesforce.

Steps to Configure and Set up Adobe Sign for Salesforce:

Step 1: Click on the Adobe Acrobat sign Admin Tab link your Adobe account to your Salesforce account.

Steps to Configure and Set up Adobe Sign for Salesforce:

Step 2: Link your Adobe account to your Salesforce account. If you already have an Adobe account then click “Sign in to Adobe”. If not create an account and click on “Sign up free trial account”. For Reference click this link to create Adobe Account https://account.adobe.com.


Step 3: After linking the Salesforce account to the Adobe account, link the Document builder to the Adobe account.

Click on App launcher>Document Builder Admin. Click on the Document Builder tab and connect Document Builder to your Adobe account.


Step 4 : Click on the Agreement Templates Tab and create an Agreement Template. For testing purposes, I have created a Template. Check the below Screenshot.

Step 5 : Inside the Test Template, we carefully set up and configured each step.

  • when you click on “Template Details,” you can add a Salesforce object that represents the specific object record for which you want to create a document.

  • After clicking “Next” on the “Template Details” page, you will be directed to the “Attachment” section. In this step, you can add the specific document that you want to obtain signatures for. if you wish to create a new document, simply click on “Create New Template” as shown in the screenshot below. This option allows you to initiate the document creation process.

Step 6 : Next Section – Recipients: Specify the Recipient to Whom You Will Send the Document for Signature.

To create a new template, simply click on the “Create a New Template” button. This action will initiate the template creation process, allowing you to set up a fresh template from scratch.

Steps to create a new Template

  • Click on “Create a New Template,” and in the first section labeled “Sample Data,” you can add the specific record for which you want to generate a document. In this case, you can select the Opportunity record as shown in the screenshot below.

  • The second section to “Add Fields” which Opportunity record fields you want to add to your document.

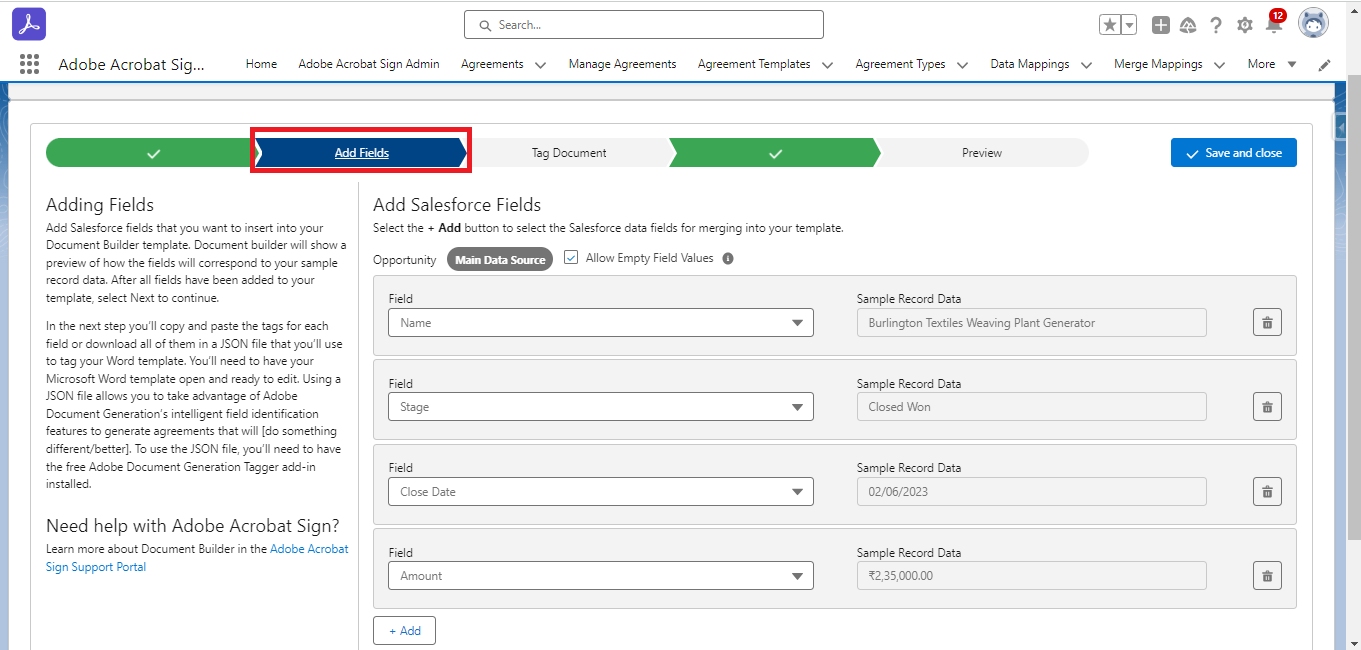
  • Third Section is tag Document which fields you want to merge in your document. Only copy and paste into your document.

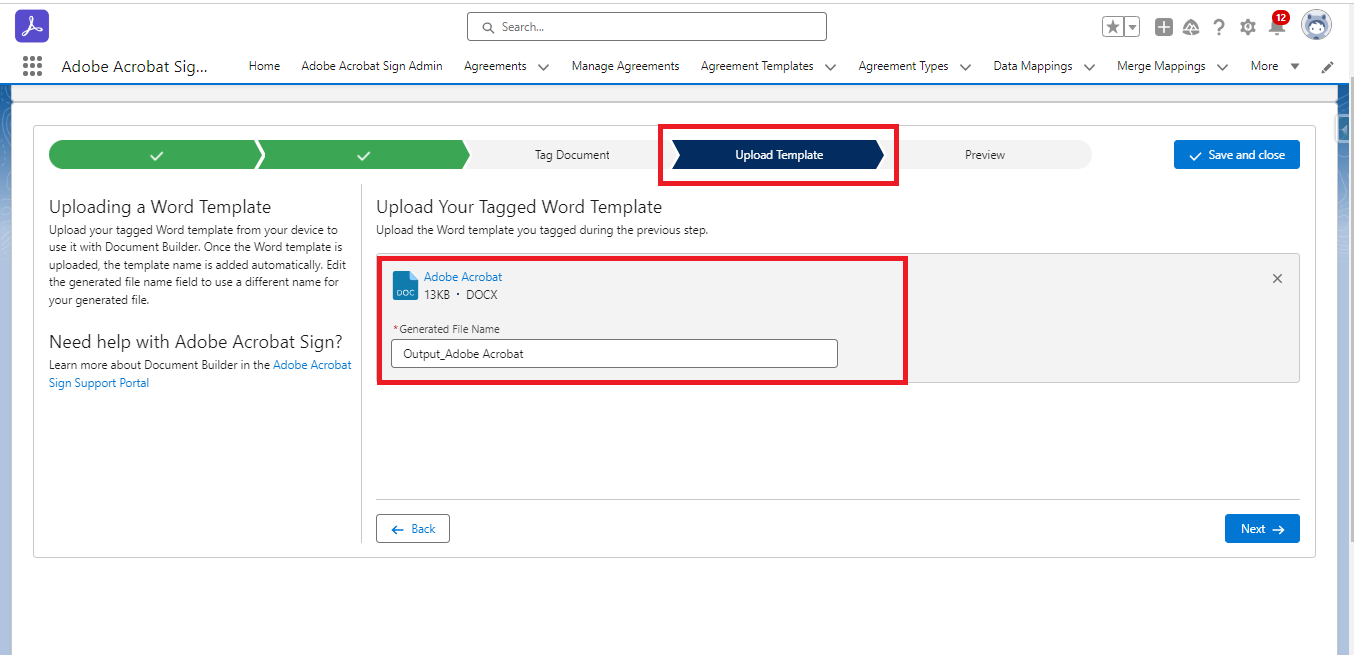
  • Next Section – Upload Document with Merged Opportunity Fields:

  • Next Section – Preview: Please take a moment to review your document.

Creating a Custom Opportunity Button to Send Document for Signing.

Step

1. Click on object Manger>Opportunity>Click Button, Links, and Action.

2. Under Button, Links, and Action. > Click the new button and link. Create a button.

In this button, the template refers to the Agreement Templates ID.

3. Now, let’s proceed by clicking on “Page Layout” to add the custom button to your Opportunity page.

Now, let’s navigate to an Opportunity record to see your newly added custom button in action. When you open an Opportunity record, you’ll notice the custom button prominently displayed on the page layout.

To initiate the document signing process, click on the “Send with Adobe” custom button. This button has been specifically added to the Opportunity page layout for your convenience.

When you click on the “Send with Adobe” button, the document will be automatically sent to the specified recipients for signature. Now sign the document.

Now, open the agreement and sign the document. After signing, you may receive a confirmation email indicating that you have successfully signed the agreement.

Conclusion

Summing up, the Adobe Sign and Salesforce integration offers a streamlined solution for document management and eSignatures within Salesforce. Follow the steps above and get started with an effortless e-signing experience with Abode Sign for Salesforce.

To stay updated with more helpful guides and tips, stay tuned to our Salesforce tutorial blogs!

Related Articles

In this detailed guide, we will walk you through the significant yet easy steps to configure Email to Salesforce. Without any further ado, let’s get started! About Email to Salesforce As the term refers, Email to Salesforce is valuable for any organization that businesses use as their Customer Relationship Management (CRM) platform. It helps streamline […]

Read More
Guide on CRUD Operations in Node.js with jsForce

CRM developers typically need to integrate Salesforce with Node.js apps. One well-known library for this purpose is jsForce, which provides a comprehensive set of tools for interacting with Salesforce data and performing CRUD tasks effectively. Let’s dive into the blog, where you will understand the use of jsForce to execute key CRUD tasks within Salesforce, […]

Read More
How to Implement Round Robin Assignments in Salesforce Using Apex

Ensuring a proper workload balance and quick follow-ups from internal or external team members, leads, opportunities, or task distributions is crucial. To achieve this, all you need is a Round Robin assignment. In this step-by-step guide, we will walk you through the process of implementing a round-robin assignment in Salesforce using Apex. Here, we’ve used […]

Read More
Best Salesforce Developments Services Provider

In this step-by-step guide, we will walk you through the significant role of Large Data Volumes in Salesforce, and what strategies or practices you should keep in mind. What is Large Data Volumes? In Salesforce, Large Data Volumes (LDV) refers to managing a huge amount of records available in the platform. LDV usually comes into […]

Read More

Salesforce Apex includes numerous built-in text handling classes, and in addition to them, the Pattern and Matcher classes are good for performing complex string operations. These classes enable us to define and work with regular expressions, which are of particular importance for data validation, searching, and modification. In this technical blog, we will find out […]

Read More

Maintaining security and compliance in Salesforce requires effective user access management. This article will lead you through the process of creating expiration dates for Permission Sets and Permission Set Groups, allowing you to automate access removal while minimizing manual work. Know how this functionality simplifies workflows, guarantees compliance, and improves security procedures. Why Use Expiration […]

Read More
Our Location worldwide
Indian Flag India
3rd Floor, A-10, Pegasus Tower, Sector 68, Noida, Uttar Pradesh 201301 +91-1203117884
United States of America Flag USA
333 West Brown Deer Road Unit G – 366 Milwaukee WI, USA 53217 +1(262) 310-7818
United Kingdom Flag UK
7 Bell Yard, London, WC2A 2JR +44 20 3239 9428
Canada Canada
HIC Global Solutions INC
43 Lafferty Lane, Richmond Hill, L4C 3N8, CA +1(262) 310-7818