Salesforce to Quickbooks Integration is crucial for many businesses.
This gives full visibility into how the business is performing and what improvements can be made. Using CRM and accounting software, customer information and invoicing are shared between the two departments.
With Salesforce to QuickBooks integration, you can reduce duplicate data entry, increase productivity, and gain more insights for better forecasting.
>Function : On Creating an Account in Salesforce, we have a customer in Quickbooks.
In the subsequent sections, we have shared the steps to Integrate Salesforce to Quickbooks. Check them out!
Step 1: Create an Authentication Provider with your Quickbooks ‘Production or Sandbox’ Organization
I. Create a QuickBooks OAuth 2.0
>Login to Intuit’s Developer website with QuickBooks credentials.
>Then click on the keys & credential section on the left tab
>Go on Dashboard and click on your Org.
>Get ‘Client ID’ and a ‘Client Secret’.
> Return to the Keys & credentials section to obtain the ‘Client ID’ and ‘Client Secret’.
>Repeat this process to make sure that the ‘Client ID’ and ‘Client Secret’ codes are generated for both Production (under Production Key & OAuth) and Sandbox org (under Development > Key & OAuth) respectively.
II. Create an Authorization Provider
- Login to the Salesforce Org.
- Navigate to the Authorization provider page (Setup > Security Controls > Auth Provider) and create a new Auth Provider.
- Open the new Auth Provider page and select the provider type ‘Open ID Connect’. Enter the below details and save the record.
- Name: Enter the Name (e.g.QuickBooks_OAuth_V2)
- Provider Type: “Open ID Connect”
- Consumer Key: Client ID value (Copy and Paste from QuickBooks, one you get above )
- Consumer Secret: Client Secret value (Copy and Paste from QuickBooks, one you get above)
- Authorize Endpoint URL: https://appcenter.intuit.com/connect/oauth2
- Token Endpoint URL: https://oauth.platform.intuit.com/oauth2/v1/tokens/bearer
- Do not change the value of any other field.
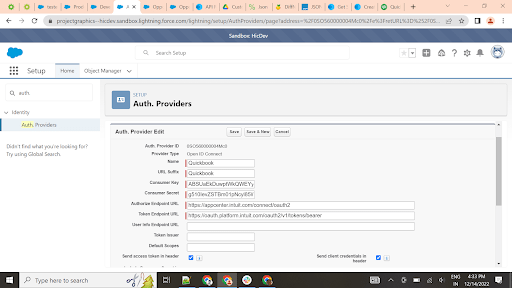
Note : If Auth Provider is created on the sandbox, the Client ID and Client Secret values are copied from the ‘Keys & OAuth’ under Development. If Auth Provider is created on the production, the Client ID and Client Secret values are copied from the ‘Keys & OAuth’ under the Production tab.
Note : The Auth Provider should be created using the same name as the App that was created on QuickBooks.
After saving the ‘Auth Provider’, Make note of the generated callback URL at the bottom of the page.
Note : Space is not allowed in the callback URL which is built from the Company Name Credential created in the Quickbooks Developer App
Copy the callback URL (from the above step) and paste it into the Redirect URIs on QuickBooks App. (Key & OAuth > Redirect URIs Add URI > Paste the callback URL on the Link box).
Note : If the callback URL link is copied from production, then the link is pasted on Redirect URI under the ‘Key and OAuth’ section of the Production tab. Otherwise, the link is pasted on Redirect URI under the ‘Key and OAuth’ section of the Development tab.
III. Create Named Credentials
- Navigate to Named Credential Page (Setup > Security Controls > Named Credentials)
- Create a new Named Credential record by entering the values into the below fields and click on save.
- Name: Enter the name (e.g. Quickbooks_REST_API)
- URL: https://quickbooks.api.intuit.com
- Identity Type: Named Principle
- Authentication Protocol: OAuth 2.0
- Authentication Provider: Name of the Authentication Provider which was created in the above section.
- Scope: com.intuit.quickbooks.accounting
- Start Authentication Flow on Save: Set to ‘True’
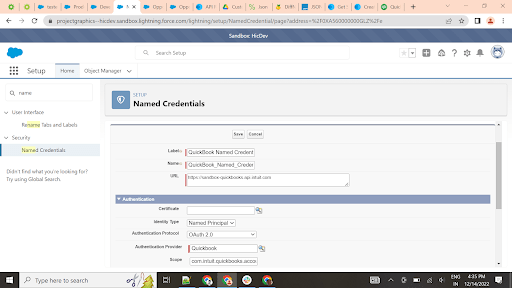
Note : Don’t change or populate any other than the above-mentioned fields.
Note : The Named Credential should be created using the same name as the App that was created on QuickBooks.
- Now Open Developer Console and paste the following code to create a Customer on Quickbooks on Creating Account on Salesforce.
Step 2: Create a Trigger on Account and paste below code:
Create a class and paste below code :
Now we will create an Account in Salesforce
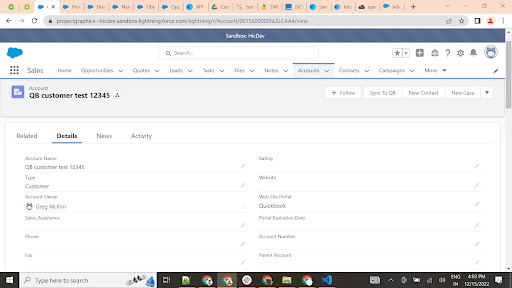
This will get reflected in the Quickbooks as Customer
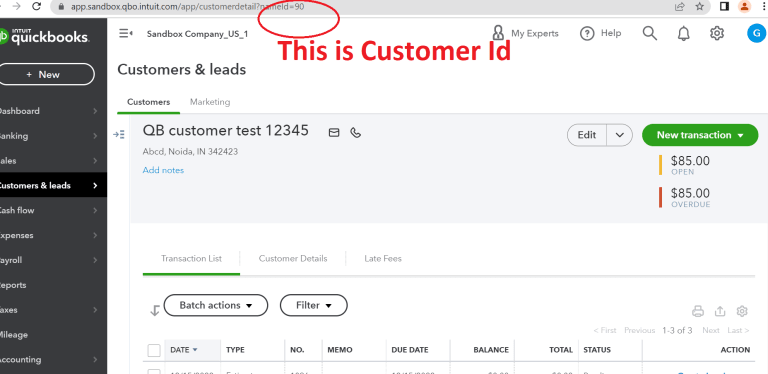
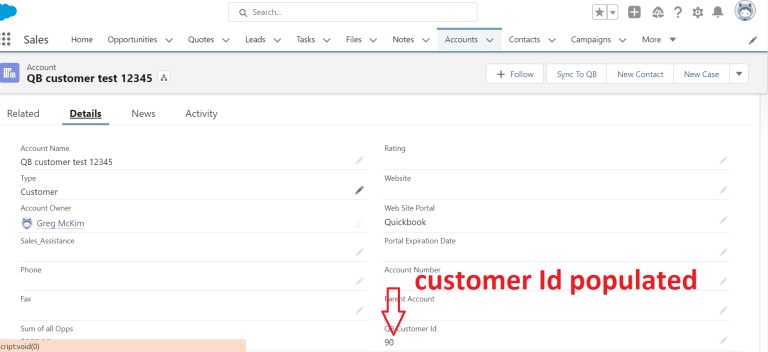
Now the Customer Id gets reflected in the Account record in salesforce as Quickbooks Customer Id
Conclusion
Integrating Salesforce with Quickbooks has never been easier than this! We hope that you like this solution. Do share your experience with us, and feel free to reach out to us if you need help implementing the solution. We would be happy to help!
Share This Blog
Table of contents
- Step 1: Create an Authentication Provider with your Quickbooks ‘Production or Sandbox’ Organization
- I. Create a QuickBooks OAuth 2.0
- II. Create an Authorization Provider
- III. Create Named Credentials
- Step 2: Create a Trigger on Account and paste below code:
- Create a class and paste below code :
- Conclusion
